
Creating a Pyramid Project
As we saw in Creating Your First Pyramid Application, it’s possible to create a Pyramid application completely manually. However, it’s usually more convenient to use a scaffold to generate a basic Pyramid project.
A project is a directory that contains at least one Python package. You’ll use a scaffold to create a project, and you’ll create your application logic within a package that lives inside the project. Even if your application is extremely simple, it is useful to place code that drives the application within a package, because: 1) a package is more easily extended with new code and 2) an application that lives inside a package can also be distributed more easily than one which does not live within a package.
Pyramid comes with a variety of scaffolds that you can use to generate a project. Each scaffold makes different configuration assumptions about what type of application you’re trying to construct.
These scaffolds are rendered using the pcreate command that is installed
as part of Pyramid.
Scaffolds Included with Pyramid
The convenience scaffolds included with Pyramid differ from each other on a number of axes:
- the persistence mechanism they offer (no persistence mechanism, ZODB, or SQLAlchemy).
- the mechanism they use to map URLs to code (traversal or URL dispatch).
The included scaffolds are these:
starter- URL mapping via URL dispatch and no persistence mechanism.
zodb- URL mapping via traversal and persistence via ZODB. Note that, as of this writing, this scaffold will not run under Python 3, only under Python 2.
alchemy- URL mapping via URL dispatch and persistence via SQLAlchemy
Creating the Project
In Installing Pyramid, you created a virtual Python environment via
the virtualenv command. To start a Pyramid project, use
the pcreate command installed within the virtualenv. We’ll choose the
starter scaffold for this purpose. When we invoke pcreate, it will
create a directory that represents our project.
In Installing Pyramid we called the virtualenv directory env; the
following commands assume that our current working directory is the env
directory.
On UNIX:
$ bin/pcreate -s starter MyProject
Or on Windows:
> Scripts\pcreate -s starter MyProject
The above command uses the pcreate command to create a project with the
starter scaffold. To use a different scaffold, such as
alchemy, you’d just change the -s argument value. For example,
on UNIX:
$ bin/pcreate -s alchemy MyProject
Or on Windows:
> Scripts\pcreate -s alchemy MyProject
Here’s sample output from a run of pcreate on UNIX for a project we name
MyProject:
$ bin/pcreate -s starter MyProject
Creating template pyramid
Creating directory ./MyProject
# ... more output ...
Running /Users/chrism/projects/pyramid/bin/python setup.py egg_info
As a result of invoking the pcreate command, a directory named
MyProject is created. That directory is a project directory.
The setup.py file in that directory can be used to distribute your
application, or install your application for deployment or development.
A .ini file named development.ini will be created in the project
directory. You will use this .ini file to configure a server, to run
your application, and to debug your application. It contains configuration
that enables an interactive debugger and settings optimized for development.
Another .ini file named production.ini will also be created in the
project directory. It contains configuration that disables any interactive
debugger (to prevent inappropriate access and disclosure), and turns off a
number of debugging settings. You can use this file to put your application
into production.
The MyProject project directory contains an additional subdirectory named
myproject (note the case difference) representing a Python
package which holds very simple Pyramid sample code. This is
where you’ll edit your application’s Python code and templates.
We created this project within an env virtualenv directory. However,
note that this is not mandatory. The project directory can go more or less
anywhere on your filesystem. You don’t need to put it in a special “web
server” directory, and you don’t need to put it within a virtualenv
directory. The author uses Linux mainly, and tends to put project
directories which he creates within his ~/projects directory. On
Windows, it’s a good idea to put project directories within a directory that
contains no space characters, so it’s wise to avoid a path that contains
i.e. My Documents. As a result, the author, when he uses Windows, just
puts his projects in C:\projects.
Warning
You’ll need to avoid using pcreate to create a project with the same
name as a Python standard library component. In particular, this means you
should avoid using the names site or test, both of which
conflict with Python standard library packages. You should also avoid
using the name pyramid, which will conflict with Pyramid itself.
Installing your Newly Created Project for Development
To install a newly created project for development, you should cd to the
newly created project directory and use the Python interpreter from the
virtualenv you created during Installing Pyramid to invoke the
command python setup.py develop
The file named setup.py will be in the root of the pcreate-generated
project directory. The python you’re invoking should be the one that
lives in the bin (or Scripts on Windows) directory of your virtual
Python environment. Your terminal’s current working directory must be the
newly created project directory.
On UNIX:
$ cd MyProject
$ ../bin/python setup.py develop
Or on Windows:
> cd MyProject
> ..\Scripts\python.exe setup.py develop
Elided output from a run of this command on UNIX is shown below:
$ cd MyProject
$ ../bin/python setup.py develop
...
Finished processing dependencies for MyProject==0.0
This will install a distribution representing your project into the
interpreter’s library set so it can be found by import statements and by
other console scripts such as pserve, pshell, proutes and
pviews.
Running The Tests For Your Application
To run unit tests for your application, you should invoke them using the
Python interpreter from the virtualenv you created during
Installing Pyramid (the python command that lives in the bin
directory of your virtualenv).
On UNIX:
$ ../bin/python setup.py test -q
Or on Windows:
> ..\Scripts\python.exe setup.py test -q
Here’s sample output from a test run on UNIX:
$ ../bin/python setup.py test -q
running test
running egg_info
writing requirements to MyProject.egg-info/requires.txt
writing MyProject.egg-info/PKG-INFO
writing top-level names to MyProject.egg-info/top_level.txt
writing dependency_links to MyProject.egg-info/dependency_links.txt
writing entry points to MyProject.egg-info/entry_points.txt
reading manifest file 'MyProject.egg-info/SOURCES.txt'
writing manifest file 'MyProject.egg-info/SOURCES.txt'
running build_ext
..
----------------------------------------------------------------------
Ran 1 test in 0.108s

OK
Note
The -q option is passed to the setup.py test command to limit the
output to a stream of dots. If you don’t pass -q, you’ll see more
verbose test result output (which normally isn’t very useful).
The tests themselves are found in the tests.py module in your pcreate
generated project. Within a project generated by the starter scaffold, a
single sample test exists.
Running The Project Application
Once a project is installed for development, you can run the application it
represents using the pserve command against the generated configuration
file. In our case, this file is named development.ini.
On UNIX:
$ ../bin/pserve development.ini
On Windows:
> ..\Scripts\pserve development.ini
Here’s sample output from a run of pserve on UNIX:
$ ../bin/pserve development.ini
Starting server in PID 16601.
serving on http://0.0.0.0:6543
When you use pserve to start the application implied by the default
rendering of a scaffold, it will respond to requests on all IP addresses
possessed by your system, not just requests to localhost. This is what
the 0.0.0.0 in serving on http://0.0.0.0:6543 means. The server will
respond to requests made to 127.0.0.1 and on any external IP address.
For example, your system might be configured to have an external IP address
192.168.1.50. If that’s the case, if you use a browser running on the
same system as Pyramid, it will be able to access the application via
http://127.0.0.1:6543/ as well as via
http://129.168.1.50:6543/. However, other people on other computers on
the same network will also be able to visit your Pyramid application in their
browser by visiting http://192.168.1.50:6543/.
If you want to restrict access such that only a browser running on the same
machine as Pyramid will be able to access your Pyramid application, edit the
development.ini file, and replace the host value in the
[server:main] section. Change it from 0.0.0.0 to 127.0.0.1. For
example:
[server:main]
use = egg:waitress#main
host = 127.0.0.1
port = 6543
You can change the port on which the server runs on by changing the same
portion of the development.ini file. For example, you can change the
port = 6543 line in the development.ini file’s [server:main]
section to port = 8080 to run the server on port 8080 instead of
port 6543.
You can shut down a server started this way by pressing Ctrl-C.
The default server used to run your Pyramid application when a project is
created from a scaffold is named Waitress. This server is what
prints the serving on... line when you run pserve. It’s a good idea
to use this server during development, because it’s very simple. It can also
be used for light production. Setting your application up under a different
server is not advised until you’ve done some development work under the
default server, particularly if you’re not yet experienced with Python web
development. Python web server setup can be complex, and you should get some
confidence that your application works in a default environment before trying
to optimize it or make it “more like production”. It’s awfully easy to get
sidetracked trying to set up a nondefault server for hours without actually
starting to do any development. One of the nice things about Python web
servers is that they’re largely interchangeable, so if your application works
under the default server, it will almost certainly work under any other
server in production if you eventually choose to use a different one. Don’t
worry about it right now.
For more detailed information about the startup process, see Startup. For more information about environment variables and configuration file settings that influence startup and runtime behavior, see Environment Variables and .ini File Settings.
Reloading Code
During development, it’s often useful to run pserve using its
--reload option. When --reload is passed to pserve, changes to
any Python module your project uses will cause the server to restart. This
typically makes development easier, as changes to Python code made within a
Pyramid application is not put into effect until the server restarts.
For example, on UNIX:
$ ../bin/pserve development.ini --reload
Starting subprocess with file monitor
Starting server in PID 16601.
serving on http://0.0.0.0:6543
Now if you make a change to any of your project’s .py files or .ini
files, you’ll see the server restart automatically:
development.ini changed; reloading...
-------------------- Restarting --------------------
Starting server in PID 16602.
serving on http://0.0.0.0:6543
Changes to template files (such as .pt or .mak files) won’t cause the
server to restart. Changes to template files don’t require a server restart
as long as the pyramid.reload_templates setting in the
development.ini file is true. Changes made to template files when
this setting is true will take effect immediately without a server restart.
Viewing the Application
Once your application is running via pserve, you may visit
http://localhost:6543/ in your browser. You will see something in your
browser like what is displayed in the following image:
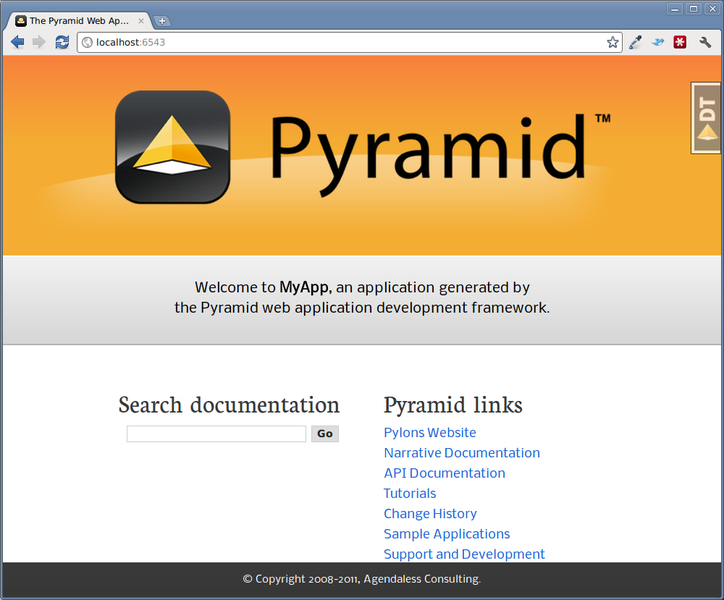
This is the page shown by default when you visit an unmodified pcreate
generated starter application in a browser.
The Debug Toolbar
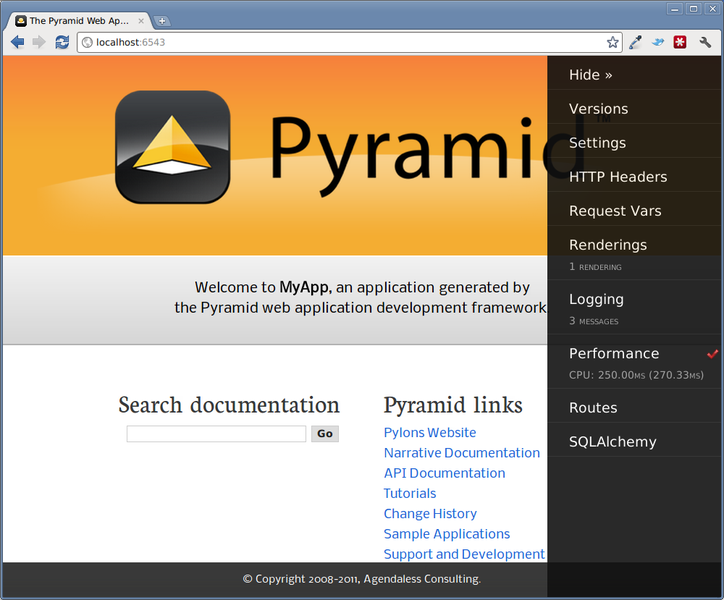
If you click on the image shown at the right hand top of the page (“^DT”),
you’ll be presented with a debug toolbar that provides various niceties while
you’re developing. This image will float above every HTML page served by
Pyramid while you develop an application, and allows you show the
toolbar as necessary. Click on Hide to hide the toolbar and show the
image again.
If you don’t see the debug toolbar image on the right hand top of the page,
it means you’re browsing from a system that does not have debugging access.
By default, for security reasons, only a browser originating from
localhost (127.0.0.1) can see the debug toolbar. To allow your
browser on a remote system to access the server, add the a line within the
[app:main] section of the development.ini file in the form
debugtoolbar.hosts = X.X.X.X. For example, if your Pyramid application
is running on a remote system, and you’re browsing from a host with the IP
address 192.168.1.1, you’d add something like this to enable the toolbar
when your system contacts Pyramid:
[app:main]
# .. other settings ...
debugtoolbar.hosts = 192.168.1.1
For more information about what the debug toolbar allows you to do, see the documentation for pyramid_debugtoolbar.
The debug toolbar will not be shown (and all debugging will be turned off)
when you use the production.ini file instead of the development.ini
ini file to run the application.
You can also turn the debug toolbar off by editing development.ini and
commenting out a line. For example, instead of:
1 2 3 4 | [app:main]
...
pyramid.includes =
pyramid_debugtoolbar
|
Put a hash mark at the beginning of the pyramid_debugtoolbar line:
1 2 3 4 | [app:main]
...
pyramid.includes =
# pyramid_debugtoolbar
|
Then restart the application to see that the toolbar has been turned off.
Note that if you comment out the pyramid_debugtoolbar line, the #
must be in the first column. If you put the hash mark anywhere except the
first column instead, for example like this:
1 2 3 4 | [app:main]
...
pyramid.includes =
#pyramid_debugtoolbar
|
When you attempt to restart the application with a section like the above you’ll receive an error that ends something like this, and the application will not start:
ImportError: No module named #pyramid_debugtoolbar
The Project Structure
The starter scaffold generated a project (named MyProject),
which contains a Python package. The package is also named
myproject, but it’s lowercased; the scaffold generates a project which
contains a package that shares its name except for case.
All Pyramid pcreate -generated projects share a similar structure.
The MyProject project we’ve generated has the following directory
structure:
MyProject/
|-- CHANGES.txt
|-- development.ini
|-- MANIFEST.in
|-- myproject
|   |-- __init__.py
|   |-- static
|   |   |-- favicon.ico
|   |   |-- logo.png
|   |   `-- pylons.css
|   |-- templates
|   |   `-- mytemplate.pt
|   |-- tests.py
|   `-- views.py
|-- production.ini
|-- README.txt
|-- setup.cfg
`-- setup.py
The MyProject Project
The MyProject project directory is the distribution and
deployment wrapper for your application. It contains both the myproject
package representing your application as well as files used to
describe, run, and test your application.
CHANGES.txtdescribes the changes you’ve made to the application. It is conventionally written in ReStructuredText format.README.txtdescribes the application in general. It is conventionally written in ReStructuredText format.development.iniis a PasteDeploy configuration file that can be used to execute your application during development.production.iniis a PasteDeploy configuration file that can be used to execute your application in a production configuration.setup.cfgis a setuptools configuration file used bysetup.py.MANIFEST.inis a distutils “manifest” file, naming which files should be included in a source distribution of the package whenpython setup.py sdistis run.setup.pyis the file you’ll use to test and distribute your application. It is a standard setuptoolssetup.pyfile.
development.ini
The development.ini file is a PasteDeploy configuration file.
Its purpose is to specify an application to run when you invoke pserve,
as well as the deployment settings provided to that application.
The generated development.ini file looks like so:
1 2 3 4 5 6 7 8 9 10 11 12 13 14 15 16 17 18 19 20 21 22 23 24 25 26 27 28 29 30 31 32 33 34 35 36 37 38 39 40 41 42 43 44 45 46 | [app:main]
use = egg:MyProject
pyramid.reload_templates = true
pyramid.debug_authorization = false
pyramid.debug_notfound = false
pyramid.debug_routematch = false
pyramid.default_locale_name = en
pyramid.includes =
pyramid_debugtoolbar
[server:main]
use = egg:waitress#main
host = 0.0.0.0
port = 6543
# Begin logging configuration
[loggers]
keys = root, myproject
[handlers]
keys = console
[formatters]
keys = generic
[logger_root]
level = INFO
handlers = console
[logger_myproject]
level = DEBUG
handlers =
qualname = myproject
[handler_console]
class = StreamHandler
args = (sys.stderr,)
level = NOTSET
formatter = generic
[formatter_generic]
format = %(asctime)s %(levelname)-5.5s [%(name)s][%(threadName)s] %(message)s
# End logging configuration
|
This file contains several sections including [app:main],
[server:main] and several other sections related to logging
configuration.
The [app:main] section represents configuration for your Pyramid
application. The use setting is the only setting required to be present
in the [app:main] section. Its default value, egg:MyProject,
indicates that our MyProject project contains the application that should be
served. Other settings added to this section are passed as keyword arguments
to the function named main in our package’s __init__.py module. You
can provide startup-time configuration parameters to your application by
adding more settings to this section.
Note
See Entry Points and PasteDeploy .ini Files for more information about the
meaning of the use = egg:MyProject value in this section.
The pyramid.reload_templates setting in the [app:main] section is a
Pyramid -specific setting which is passed into the framework. If it
exists, and its value is true, Chameleon and Mako
template changes will not require an application restart to be detected. See
Automatically Reloading Templates for more information.
Warning
The pyramid.reload_templates option should be turned off for
production applications, as template rendering is slowed when it is turned
on.
The pyramid.includes setting in the [app:main] section tells Pyramid
to “include” configuration from another package. In this case, the line
pyramid.includes = pyramid_debugtoolbar tells Pyramid to include
configuration from the pyramid_debugtoolbar package. This turns on a
debugging panel in development mode which will be shown on the right hand
side of the screen. Including the debug toolbar will also make it possible
to interactively debug exceptions when an error occurs.
Various other settings may exist in this section having to do with debugging or influencing runtime behavior of a Pyramid application. See Environment Variables and .ini File Settings for more information about these settings.
The name main in [app:main] signifies that this is the default
application run by pserve when it is invoked against this configuration
file. The name main is a convention used by PasteDeploy signifying that
it is the default application.
The [server:main] section of the configuration file configures a WSGI
server which listens on TCP port 6543. It is configured to listen on all
interfaces (0.0.0.0). This means that any remote system which has TCP
access to your system can see your Pyramid application.
The sections that live between the markers # Begin logging configuration
and # End logging configuration represent Python’s standard library
logging module configuration for your application. The sections
between these two markers are passed to the logging module’s config file
configuration engine when the
pserve or pshell commands are executed. The default
configuration sends application logging output to the standard error output
of your terminal. For more information about logging configuration, see
Logging.
See the PasteDeploy documentation for more information about other
types of things you can put into this .ini file, such as other
applications, middleware and alternate WSGI server
implementations.
production.ini
The production.ini file is a PasteDeploy configuration file with
a purpose much like that of development.ini. However, it disables the
debug toolbar, and filters all log messages except those above the WARN
level. It also turns off template development options such that templates
are not automatically reloaded when changed, and turns off all debugging
options. This file is appropriate to use instead of development.ini when
you put your application into production.
It’s important to use production.ini (and not development.ini) to
benchmark your application and put it into production. development.ini
configures your system with a debug toolbar that helps development, but the
inclusion of this toolbar slows down page rendering times by over an order of
magnitude. The debug toolbar is also a potential security risk if you have
it configured incorrectly.
MANIFEST.in
The MANIFEST.in file is a distutils configuration file which
specifies the non-Python files that should be included when a
distribution of your Pyramid project is created when you run python
setup.py sdist. Due to the information contained in the default
MANIFEST.in, an sdist of your Pyramid project will include .txt
files, .ini files, .rst files, graphics files, and template files, as
well as .py files. See
http://docs.python.org/distutils/sourcedist.html#the-manifest-in-template for
more information about the syntax and usage of MANIFEST.in.
Without the presence of a MANIFEST.in file or without checking your
source code into a version control repository, setup.py sdist places only
Python source files (files ending with a .py extension) into tarballs
generated by python setup.py sdist. This means, for example, if your
project was not checked into a setuptools-compatible source control system,
and your project directory didn’t contain a MANIFEST.in file that told
the sdist machinery to include *.pt files, the
myproject/templates/mytemplate.pt file would not be included in the
generated tarball.
Projects generated by Pyramid scaffolds include a default MANIFEST.in
file. The MANIFEST.in file contains declarations which tell it to
include files like *.pt, *.css and *.js in the generated tarball.
If you include files with extensions other than the files named in the
project’s MANIFEST.in and you don’t make use of a setuptools-compatible
version control system, you’ll need to edit the MANIFEST.in file and
include the statements necessary to include your new files. See
http://docs.python.org/distutils/sourcedist.html#principle for more
information about how to do this.
You can also delete MANIFEST.in from your project and rely on a
setuptools feature which simply causes all files checked into a version
control system to be put into the generated tarball. To allow this to
happen, check all the files that you’d like to be distributed along with your
application’s Python files into Subversion. After you do this, when you
rerun setup.py sdist, all files checked into the version control system
will be included in the tarball. If you don’t use Subversion, and instead
use a different version control system, you may need to install a setuptools
add-on such as setuptools-git or setuptools-hg for this behavior to
work properly.
setup.py
The setup.py file is a setuptools setup file. It is meant to be
run directly from the command line to perform a variety of functions, such as
testing your application, packaging, and distributing your application.
Note
setup.py is the de facto standard which Python developers use to
distribute their reusable code. You can read more about setup.py files
and their usage in the Setuptools documentation and The
Hitchhiker’s Guide to Packaging.
Our generated setup.py looks like this:
1 2 3 4 5 6 7 8 9 10 11 12 13 14 15 16 17 18 19 20 21 22 23 24 25 26 27 28 29 30 31 32 33 34 35 36 37 38 39 40 | import os
from setuptools import setup, find_packages
here = os.path.abspath(os.path.dirname(__file__))
README = open(os.path.join(here, 'README.txt')).read()
CHANGES = open(os.path.join(here, 'CHANGES.txt')).read()
requires = [
'pyramid',
'pyramid_debugtoolbar',
'waitress',
]
setup(name='MyProject',
version='0.0',
description='MyProject',
long_description=README + '\n\n' + CHANGES,
classifiers=[
"Programming Language :: Python",
"Framework :: Pyramid",
"Topic :: Internet :: WWW/HTTP",
"Topic :: Internet :: WWW/HTTP :: WSGI :: Application",
],
author='',
author_email='',
url='',
keywords='web pyramid pylons',
packages=find_packages(),
include_package_data=True,
zip_safe=False,
install_requires=requires,
tests_require=requires,
test_suite="myproject",
entry_points="""\
[paste.app_factory]
main = myproject:main
""",
)
|
The setup.py file calls the setuptools setup function, which does
various things depending on the arguments passed to setup.py on the
command line.
Within the arguments to this function call, information about your application is kept. While it’s beyond the scope of this documentation to explain everything about setuptools setup files, we’ll provide a whirlwind tour of what exists in this file in this section.
Your application’s name can be any string; it is specified in the name
field. The version number is specified in the version value. A short
description is provided in the description field. The
long_description is conventionally the content of the README and CHANGES
file appended together. The classifiers field is a list of Trove classifiers
describing your application. author and author_email are text fields
which probably don’t need any description. url is a field that should
point at your application project’s URL (if any).
packages=find_packages() causes all packages within the project to be
found when packaging the application. include_package_data will include
non-Python files when the application is packaged if those files are checked
into version control. zip_safe indicates that this package is not safe
to use as a zipped egg; instead it will always unpack as a directory, which
is more convenient. install_requires and tests_require indicate that
this package depends on the pyramid package. test_suite points at
the package for our application, which means all tests found in the package
will be run when setup.py test is invoked. We examined entry_points
in our discussion of the development.ini file; this file defines the
main entry point that represents our project’s application.
Usually you only need to think about the contents of the setup.py file
when distributing your application to other people, when adding Python
package dependencies, or when versioning your application for your own use.
For fun, you can try this command now:
$ python setup.py sdist
This will create a tarball of your application in a dist subdirectory
named MyProject-0.1.tar.gz. You can send this tarball to other people
who want to install and use your application.
setup.cfg
The setup.cfg file is a setuptools configuration file. It
contains various settings related to testing and internationalization:
Our generated setup.cfg looks like this:
1 2 3 4 5 6 7 8 9 10 11 12 13 14 15 16 17 18 19 20 21 22 23 24 25 26 27 | [nosetests]
match = ^test
nocapture = 1
cover-package = myproject
with-coverage = 1
cover-erase = 1
[compile_catalog]
directory = myproject/locale
domain = MyProject
statistics = true
[extract_messages]
add_comments = TRANSLATORS:
output_file = myproject/locale/MyProject.pot
width = 80
[init_catalog]
domain = MyProject
input_file = myproject/locale/MyProject.pot
output_dir = myproject/locale
[update_catalog]
domain = MyProject
input_file = myproject/locale/MyProject.pot
output_dir = myproject/locale
previous = true
|
The values in the default setup file allow various commonly-used internationalization commands and testing commands to work more smoothly.
The myproject Package
The myproject package lives inside the MyProject
project. It contains:
- An
__init__.pyfile signifies that this is a Python package. It also contains code that helps users run the application, including amainfunction which is used as a entry point for commands such aspserve,pshell,pviews, and others. - A
templatesdirectory, which contains Chameleon (or other types of) templates. - A
tests.pymodule, which contains unit test code for the application. - A
views.pymodule, which contains view code for the application.
These are purely conventions established by the scaffold: Pyramid doesn’t insist that you name things in any particular way. However, it’s generally a good idea to follow Pyramid standards for naming, so that other Pyramid developers can get up to speed quickly on your code when you need help.
__init__.py
We need a small Python module that configures our application and which
advertises an entry point for use by our PasteDeploy .ini file.
This is the file named __init__.py. The presence of an __init__.py
also informs Python that the directory which contains it is a package.
1 2 3 4 5 6 7 8 9 10 11 | from pyramid.config import Configurator
def main(global_config, **settings):
""" This function returns a Pyramid WSGI application.
"""
config = Configurator(settings=settings)
config.add_static_view('static', 'static', cache_max_age=3600)
config.add_route('home', '/')
config.scan()
return config.make_wsgi_app()
|
Line 1 imports the Configurator class from
pyramid.configthat we use later.Lines 4-11 define a function named
mainthat returns a Pyramid WSGI application. This function is meant to be called by the PasteDeploy framework as a result of runningpserve.Within this function, application configuration is performed.
Line 7 creates an instance of a Configurator.
Line 8 registers a static view, which will serve up the files from the
myproject:staticasset specification (thestaticdirectory of themyprojectpackage).Line 9 adds a route to the configuration. This route is later used by a view in the
viewsmodule.Line 10 calls
config.scan(), which picks up view registrations declared elsewhere in the package (in this case, in theviews.pymodule).Line 11 returns a WSGI application to the caller of the function (Pyramid’s pserve).
views.py
Much of the heavy lifting in a Pyramid application is done by view callables. A view callable is the main tool of a Pyramid web application developer; it is a bit of code which accepts a request and which returns a response.
1 2 3 4 5 6 | from pyramid.view import view_config
@view_config(route_name='home', renderer='templates/mytemplate.pt')
def my_view(request):
return {'project': 'MyProject'}
|
Lines 4-6 define and register a view callable named my_view. The
function named my_view is decorated with a view_config decorator
(which is processed by the config.scan() line in our __init__.py).
The view_config decorator asserts that this view be found when a
route named home is matched. In our case, because our
__init__.py maps the route named home to the URL pattern /, this
route will match when a visitor visits the root URL. The view_config
decorator also names a renderer, which in this case is a template that
will be used to render the result of the view callable. This particular view
declaration points at templates/mytemplate.pt, which is a asset
specification that specifies the mytemplate.pt file within the
templates directory of the myproject package. The asset
specification could have also been specified as
myproject:templates/mytemplate.pt; the leading package name and colon is
optional. The template file it actually points to is a Chameleon ZPT
template file.
This view callable function is handed a single piece of information: the
request. The request is an instance of the WebOb
Request class representing the browser’s request to our server.
This view returns a dictionary. When this view is invoked, a
renderer converts the dictionary returned by the view into HTML, and
returns the result as the response. This view is configured to
invoke a renderer which uses a Chameleon ZPT template
(templates/my_template.pt).
See Writing View Callables Which Use a Renderer for more information about how views, renderers, and templates relate and cooperate.
Note
Because our development.ini has a pyramid.reload_templates =
true directive indicating that templates should be reloaded when
they change, you won’t need to restart the application server to
see changes you make to templates. During development, this is
handy. If this directive had been false (or if the directive
did not exist), you would need to restart the application server
for each template change. For production applications, you should
set your project’s pyramid.reload_templates to false to increase
the speed at which templates may be rendered.
static
This directory contains static assets which support the mytemplate.pt
template. It includes CSS and images.
templates/mytemplate.pt
The single Chameleon template that exists in the project. Its
contents are too long to show here, but it displays a default page when
rendered. It is referenced by the call to @view_config as the
renderer of the my_view view callable in the views.py file. See
Writing View Callables Which Use a Renderer for more information about renderers.
Templates are accessed and used by view configurations and sometimes by view functions themselves. See Using Templates Directly and Templates Used as Renderers via Configuration.
tests.py
The tests.py module includes unit tests for your application.
1 2 3 4 5 6 7 8 9 10 11 12 13 14 15 16 17 | import unittest
from pyramid import testing
class ViewTests(unittest.TestCase):
def setUp(self):
self.config = testing.setUp()
def tearDown(self):
testing.tearDown()
def test_my_view(self):
from .views import my_view
request = testing.DummyRequest()
info = my_view(request)
self.assertEqual(info['project'], 'MyProject')
|
This sample tests.py file has a single unit test defined within it. This
test is executed when you run python setup.py test. You may add more
tests here as you build your application. You are not required to write
tests to use Pyramid, this file is simply provided as convenience and
example.
See Unit, Integration, and Functional Testing for more information about writing Pyramid unit tests.
Modifying Package Structure
It is best practice for your application’s code layout to not stray too much from accepted Pyramid scaffold defaults. If you refrain from changing things very much, other Pyramid coders will be able to more quickly understand your application. However, the code layout choices made for you by a scaffold are in no way magical or required. Despite the choices made for you by any scaffold, you can decide to lay your code out any way you see fit.
For example, the configuration method named
add_view() requires you to pass a
dotted Python name or a direct object reference as the class or
function to be used as a view. By default, the starter scaffold would
have you add view functions to the views.py module in your package.
However, you might be more comfortable creating a views directory, and
adding a single file for each view.
If your project package name was myproject and you wanted to arrange all
your views in a Python subpackage within the myproject package
named views instead of within a single views.py file, you might:
- Create a
viewsdirectory inside yourmyprojectpackage directory (the same directory which holdsviews.py). - Move the existing
views.pyfile to a file inside the newviewsdirectory named, say,blog.py. - Create a file within the new
viewsdirectory named__init__.py(it can be empty, this just tells Python that theviewsdirectory is a package.
You can then continue to add view callable functions to the blog.py
module, but you can also add other .py files which contain view callable
functions to the views directory. As long as you use the
@view_config directive to register views in conjunction with
config.scan() they will be picked up automatically when the application
is restarted.
Using the Interactive Shell
It is possible to use the pshell command to load a Python interpreter
prompt with a similar configuration as would be loaded if you were running
your Pyramid application via pserve. This can be a useful debugging tool.
See The Interactive Shell for more details.
What Is This pserve Thing
The code generated by an Pyramid scaffold assumes that you will be
using the pserve command to start your application while you do
development. pserve is a command that reads a PasteDeploy
.ini file (e.g. development.ini) and configures a server to serve a
Pyramid application based on the data in the file.
pserve is by no means the only way to start up and serve a Pyramid
application. As we saw in Creating Your First Pyramid Application, pserve needn’t be
invoked at all to run a Pyramid application. The use of pserve to
run a Pyramid application is purely conventional based on the output
of its scaffolding. But we strongly recommend using while developing your
application, because many other convenience introspection commands (such as
pviews, prequest, proutes and others) are also implemented in
terms of configuration availability of this .ini file format. It also
configures Pyramid logging and provides the --reload switch for
convenient restarting of the server when code changes.
Using an Alternate WSGI Server
Pyramid scaffolds generate projects which use the Waitress WSGI server. Waitress is a server that is suited for development and light production usage. It’s not the fastest nor the most featureful WSGI server. Instead, its main feature is that it works on all platforms that Pyramid needs to run on, making it a good choice as a default server from the perspective of Pyramid’s developers.
Any WSGI server is capable of running a Pyramid application. But we suggest you stick with the default server for development, and that you wait to investigate other server options until you’re ready to deploy your application to production. Unless for some reason you need to develop on a non-local system, investigating alternate server options is usually a distraction until you’re ready to deploy. But we recommend developing using the default configuration on a local system that you have complete control over; it will provide the best development experience.
One popular production alternative to the default Waitress server is mod_wsgi. You can use mod_wsgi to serve your Pyramid application using the Apache web server rather than any “pure-Python” server like Waitress. It is fast and featureful. See Running a Pyramid Application under mod_wsgi for details.
Another good production alternative is Green Unicorn (aka
gunicorn). It’s faster than Waitress and slightly easier to configure
than mod_wsgi, although it depends, in its default configuration, on having a
buffering HTTP proxy in front of it. It does not, as of this writing, work
on Windows.